
To configure your email on your Android phone or tablet, follow these steps:
1. Launch the Settings app on your device.
2. Once it launches, tap on Accounts.
3. Tap on Add Account.
4. Select Email as the Account Type
5. Email Address: Enter your Photobiz Mailbox email address (ex: kyle@photobizlovesme.com)
Password: Enter your Mailbox password for your email address.
6. Tap Sign In
7. Tap IMAP account
8. Enter the following server details (Important: If any field is labeled as "optional" or auto-filled for you, manually enter the details as displayed below to avoid errors)
Email address: Enter your Photobiz Mailbox email address (ex: kyle@photobizlovesme.com)
Username: Enter your Photobiz Mailbox email address (ex: kyle@photobizlovesme.com)
Password: Your mailbox password
IMAP Server: secure.emailsrvr.com
Security Type: SSL
Port: 993
SMTP Server: secure.emailsrvr.com
Security Type: SSL
Port: 465
Authentication required before sending emails: On
Username: Enter your Photobiz Mailbox email address (ex: kyle@photobizlovesme.com)
Password: Your mailbox password
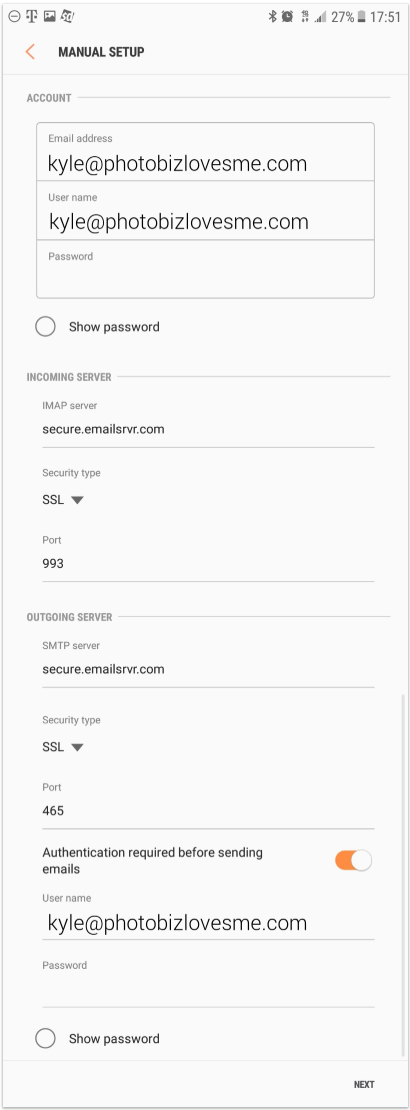
9. Tap Next
If you received an Authentication Failed message, this means your username or password are incorrect. Here are some tips to resolve this:
- Make sure your user name is typed as shown above and that you did not make a typo (it happens!)
- Try accessing webmail via a web browser
- If your browser has a saved password, remove it and manually enter it, to make sure you're using the same password you tried on your mobile device
- If you cannot access webmail, you will need to reach out to your email admin for a possible password reset.
- If you can access webmail, triple check you're typing the same password you used for webmail
- If issues persist, contact your email admin
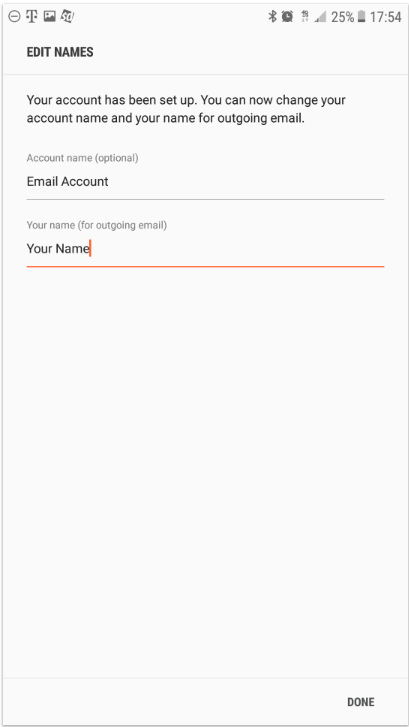
10. Modify the settings as desired
11. Tap Next
12. Account Name: Used to distinguish the account in your device
Your Name: Name shown on outgoing emails
13. You are all set! Go back to the main menu, open the Email app and your messages should start syncing. Please give it a few minutes to download data before troubleshooting.