What is the difference between vector and raster graphics?
May 31, 2024 | By: PhotoBiz Knowledge Base
There are many options when creating graphic files, so why is it that occasionally some files can appear clear and crisp when used on the web, while others can appear blurry or pixelated? The answer is that there are two main types of graphic files: Vector Graphics, and Raster Graphics. In this article, you will learn the difference between the two types as well as the benefits of each and the situations to use them.
Raster Graphics are comprised of tiny squares of color information, which are usually referred to as pixels, or dots.
Raster Graphics are usually measured in Dots Per Inch (dpi) when creating images or graphics for print, or Pixels Per Inch (PPI) when creating images or graphics for web use, which allows you to measure how much detailed color information a specific image contains.
- For example, if you have a 2-inch x 2-inch image at a resolution of 300 PPI, your image contains a total of 600 pixels of color that provide the detail, color, and shading information for your image.
Note: With higher PPI or dpi images or graphics, your subtle details will be more noticeable.
Most popular file formats for Raster Graphics:
- JPG
- PSD
- PNG
- TIFF
- GIF
- BMP
You can use a variety of programs to create Raster Graphics, however, one of the most popular programs that designers choose is Adobe Photoshop.
Pros & Cons of using Raster Graphics:
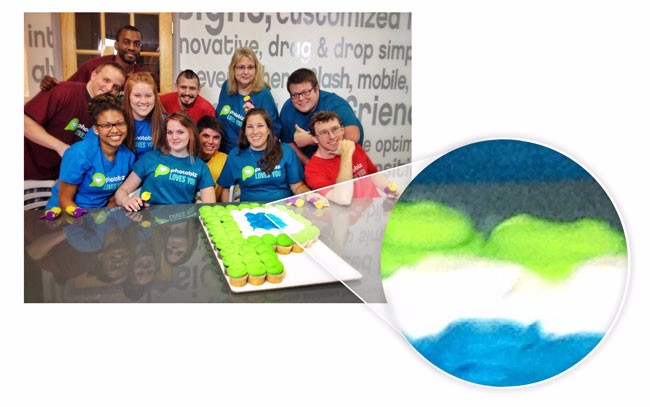
Raster Graphics offer greater color detail, however since they are pixel-based, this also means they have a finite number of pixels. Therefore, when you attempt to enlarge a Raster Graphic, the computer attempts to fill in the gaps from missing pixels with what it attempts to guess are the colors that should fit into the spaces. The interpolation of data is what causes the enlarged image to appear blurry or pixelated since the computer does not have a way to know the exact colors that should be inserted. You can see an example of this in the screenshot below, where the inset shows what this raster image looks like when sized to 500% of its normal size:

Note: One way to use Adobe Photoshop to combat pixelation and/or blurriness due to resizing when creating a graphic is to convert your image into a Smart Object, which will allow your image to retain the informtion from it's original file size, in turn allowing you to size the image to be smaller, then resize it to be larger again, without losing image quality. This would not be possible with a regular Raster Graphic.
Raster Graphics allow you to have more precise control over editing your graphic's detail and color information.
- For example, with a Raster Graphic, you can modify individual pixels of color within your image, therefore the customization options available with Raster Graphics are essentially limitless.
In the same sense, a con to this aspect is that if you would like to have increased control to modify individual pixels within your image, more than likely you would want to use a high-resolution image (such as a 300 ppi/dpi or higher for example). This will usually result in larger file sizes than Vector Graphics, which contain less detailed color information.
- As an example, if you have a 300ppi photograph that is 16" x 20", your image will have a total of 96,000 total pixels, which is a lot of individual pixels of information for your computer to process at once, often resulting in a large file size.
While Raster Graphics are comprised of individual pixels, Vector Graphics are built using mathematically defined areas to produce shapes, lines, and curves. This is why Vector graphics are suited for graphic elements that are more geometric in nature such as shapes and text, whereas Raster Graphics are suited for more detailed graphics such as images.
Vector Graphics use points to create these shapes, lines, and curves, so where our previous example for Raster Graphics cited an image that was 2 inches x 2 inches at 300 ppi (containing 600 individual pixels of information for the image), a Vector Graphic of the same size contains merely four points that enclose the shape, and the computer uses mathematically defined areas to fill in the missing information.
Most popular file formats for Vector Graphics:
- EPS
- AI
You can also use a variety of software programs to create Vector Graphics, however, one of the most popular by far is Adobe Illustrator.
Note: Newer versions of Adobe Illustrator will also allow you to integrate raster elements such as drop-shadows or outer glows. In the same vein, newer versions of Adobe Photoshop have increased functionality for their vector tools such as the Shape and Line tools, the Pen tool, and the Direct Selection tool.
Pros and Cons of using Vector Graphics:
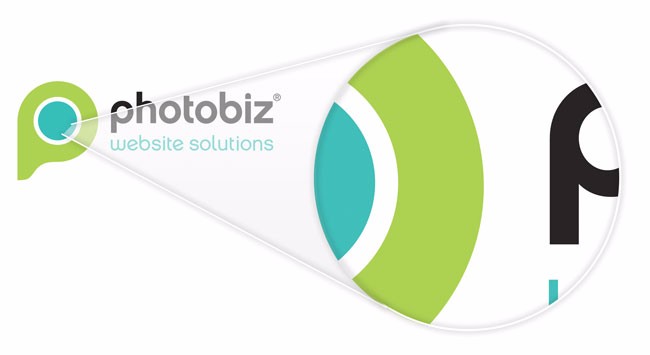
One of the best things about Vector Graphics is that they are infinitely scalable. This is due to the fact that Vector Graphics use their original equation in order to create consistent shapes whether they are being scaled up or down. This is one of the main reasons that Vector Graphics are usually recommended for Logos, or for large-scale printing. For creating graphics for web use, you can create either Vector or Raster graphics as you can also export Vector Graphics as the popular Raster filetypes (JPG, PNG, etc.). You can see an example of how a Vector Graphic retains its original image quality even when scaled to 500% of its original size (as seen in the inset) in the screenshot below:

Another pro to using Vector Graphics is that they generally maintain more aspects of editability over Raster Graphics.
- For example, unlike opening a Rasterized JPG image, if you open a Vector Graphic you should be able to edit the original layers or shapes within it as they exist as individual elements without affecting other elements in the graphic.
A con of using Vector Graphics is that they are often more stylized in nature than Raster Graphics, which also means that you cannot apply certain Raster effects such as blurring or drop-shadows to them.
In summary, there are countless ways to create graphics for your website, and now you have the knowledge to know the difference between Vector Graphics and Raster Graphics, and when and how to use either type in your workflow.


Leave a comment
0 Comments