Welcome to our comprehensive guide on using the Form Editor in PhotoBiz! Whether you're looking to create new forms or customize existing ones, this tutorial will walk you through each step of the process. You'll learn how to choose the right form template, add and customize standard fields, capture essential client information with contact fields, and utilize powerful features like file uploads, payments, and digital signatures. By the end of this guide, you'll have all the tools you need to build and optimize forms that enhance your client interactions and streamline your workflow.
To begin click on the FORMS option in your control panel and and then choose FORM EDITOR. Click on your existing form or choose the option for NEW FORM to select the form template you wish to use. You can choose which FORM TEMPLATE you want to use between the 5 different categories by clicking on the SELECT button on the form you wish to customize. If you're looking to customize the look of your form, here's our tutorial on how to do that.
STANDARD FIELDS
Standard fields collect general information, add titles, text, and format with line breaks.
- Short Answer: Small text box for brief responses (e.g., "What is your contact preference?")
- Paragraph: Larger text area for detailed messages (e.g., "Tell me how you heard about us.")
- Radio Select: Single choice option (e.g., type of session).
- Checkbox: Multiple choice options (e.g., Check All That Apply).
- Drop Down Menu: Single answer from a list.
- Date: Select a specific date.
- Time: Select a specific time.
- Full Name: First and last name (use CONTACT FIELD FULL NAME to store in your database).
- Email: Email address (use CONTACT FIELD EMAIL to store in your database).
- Phone: Phone number (use CONTACT FIELD PHONE to store in your database).
- Address: Physical address (use CONTACT BILLING ADDRESS or MAILING ADDRESS to store in your database).
- Title: Add headers to sections of your form.
- Text: Include custom text in your form.
- Editor: Add and format custom text with links, colors, sizes, and HTML code.
- Line: Create line breaks for formatting.
Pro Tip: For sales lead generation or capturing specific customer contact information, use the CONTACT FIELDS to ensure the information is stored in your CONTACTS database.
PRO TIP!
If you're using your form for Lead Generation or if you're trying to capture SPECIFIC CUSTOMER CONTACT INFORMATION, you'll want to use the CONTACT FIELDS so that it the information is properly captured into your CONTACTS (customer database).
CONTACT (CRM) FIELDS
Contact Fields allow you to properly capture and store your client/lead's contact information each time the form is submitted. These fields will help you grow your client database and take advantage of the CLIENT RELATIONSHIP BUILDER (CRM) tools that are built into your PhotoBiz account. Your contacts are stored in the CONTACTS icon, which can be found at the top of your Control Panel.
- Full Name: First and last name, creates a contact entry.
- Email: Email address.
- Phone: Phone number.
- Billing Address: Billing address, useful for contracts and invoicing.
- Shipping Address: Shipping address.
- Work Phone: Secondary phone number.
- Birthday: Birthday.
- Company Name: Company or school/team name.
- Facebook: Facebook profile URL.
- Twitter: Twitter profile URL.
- Family & Friends: Create a referral program form for re-marketing with email marketing tools.
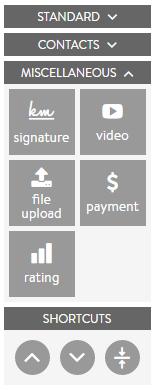
MISCELLANEOUS FIELDS
These fields are powerful tools that allow you specific functions in the FORM BUILDER.
- File Upload: Allow your client/leads to upload a file to be sent to you via your contact form. You can have up to five (5) file upload fields per form. Accepted file types are .jpg, .png, and .gif, and the maximum file size is 4MB. Files uploaded to your forms will be saved in your FILE LIBRARY & SUBMISSIONS for the form. Files are also stored in the CLIENT/LEAD'S CONTACT under SUBMISSIONS that submitted the form so you can easily reference their headshot, resume, etc. that they submitted to you.
- Payment: Allows you to configure your form to accept payments through it. FULL ARTICLE ON FORM PAYMENTS This is great for setting up to take session fees or deposits from your clients as an alternative to using INVOICING.
- Rating: Allows you to create a custom rating scale to allow your client to rate your selections, it's great for survey's and questionnaires.
- Video: Allows you to embed video into your form by adding the embed code from Youtube, Vimeo, or Animoto.
- Signature: Allows your client/lead's to digitally sign your form/contract.
You can edit any fields by clicking on the PENCIL ICON to the right of each field choice to make the field OPTIONAL or REQUIRED as well as access ADVANCED OPTIONS such as changing date and time format and adding conditions.
0 Comments